Getting Started
To get started, follow these steps:
Requirements
Python (for scripting and API backend)
Git for version control (https://git-scm.com/)
Docker and Docker Compose
QGIS (optional, might be needed for visualization, but not required for InfDB)
PgAdmin (the docker-compose.local.yaml includes a web client for PgAdmin)
Installation for Local Development
Clone the repository to your local machine:
git clone <repository_url>
Set up a virtual environment:
python -m venv venv

# For Windows
source venv\Scripts\activate

# For Linux/MacOS
source venv/bin/activate
Install dependencies:
pip install -r requirements.txt
#. Our application has dependency on 3dCityDB and Timescale; that’s why environment should be set first. Under configs folder we have multiple config files that keeps service related inputs. Information related configuration is explained under configs/Readme.md
# example for timescaledb
  timescaledb:
    user: timescale_user
    password:
    db: timescaledb_db
    host: 127.0.0.1
    port: 5432
    status: active
#. To run our databases and feed them with data, we should first run the code below. This will auto generate the docker-compose.yaml depending on our needs. Information related docker-compose generations is explained under configs/Readme.md
# example for timescaledb
  python3 -m  dockers.generate_compose
As a last step we would need to start our services.
docker-compose -f ./dockers/docker-compose.yaml up
If you had any changes related with loader, you should create the image again if you have an existing image. Then you should do:
docker-compose -f ./dockers/docker-compose.yaml build
docker-compose -f ./dockers/docker-compose.yaml up
Now you can start the application:
fastapi dev src/main.py
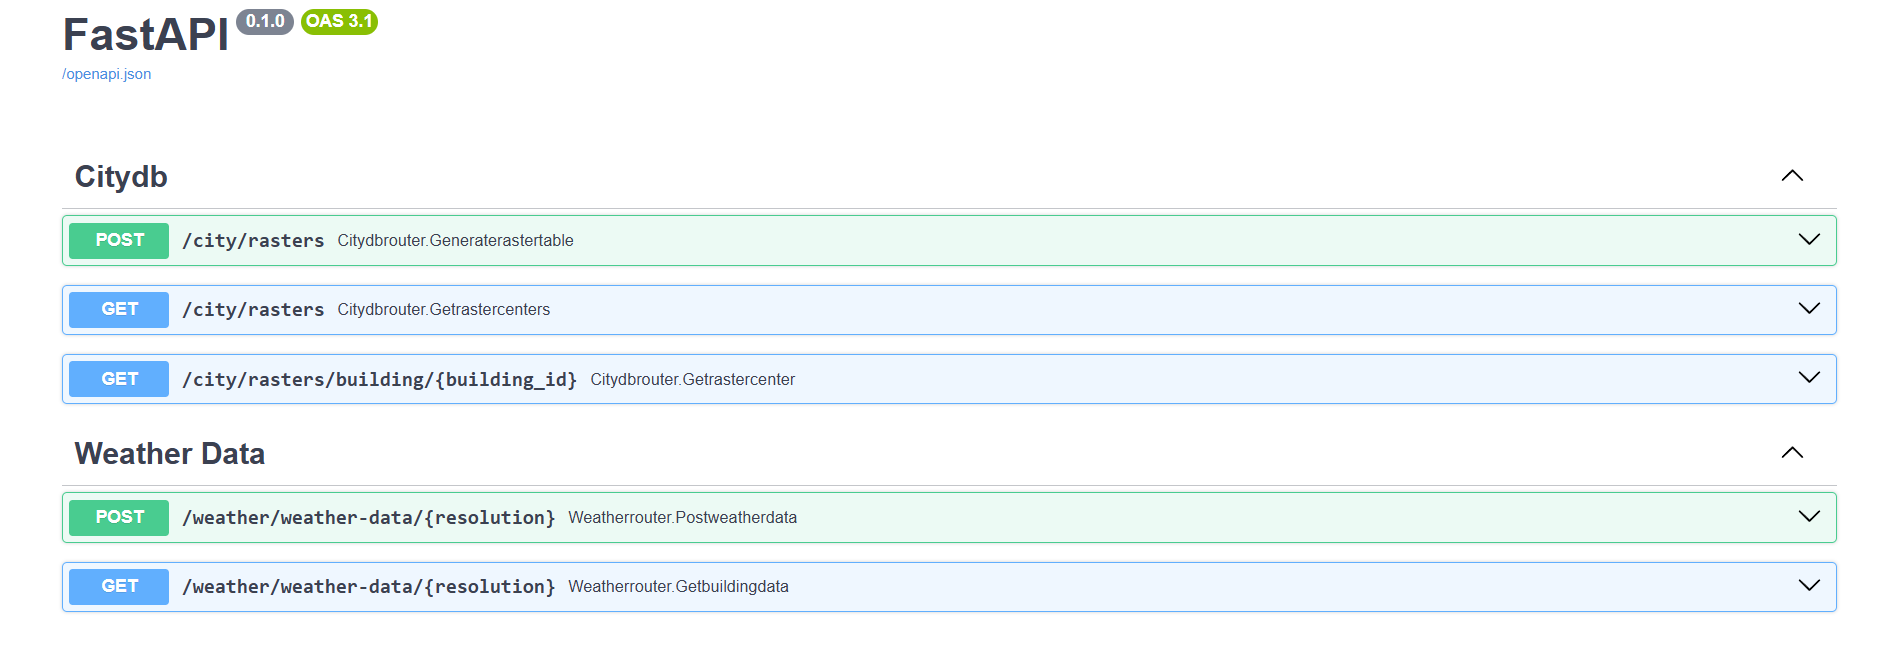
Open your browser and navigate to the API documentation at: http://127.0.0.1:8000/docs
If you want to import different sources of data other than LOD2 via loader
LOD2 data is must have for application, So if not already done in the previous steps, please import the LOD2 data. Otherwise, you can skip this.
#. Please go under configs folder and find configs_loader.yaml. There we have our loader sources defined. You firs need to set status: active. Then you can run this command:
# example for timescaledb
  python3 -m  dockers.generate_compose
  docker-compose -f ./dockers/docker-compose.yaml up
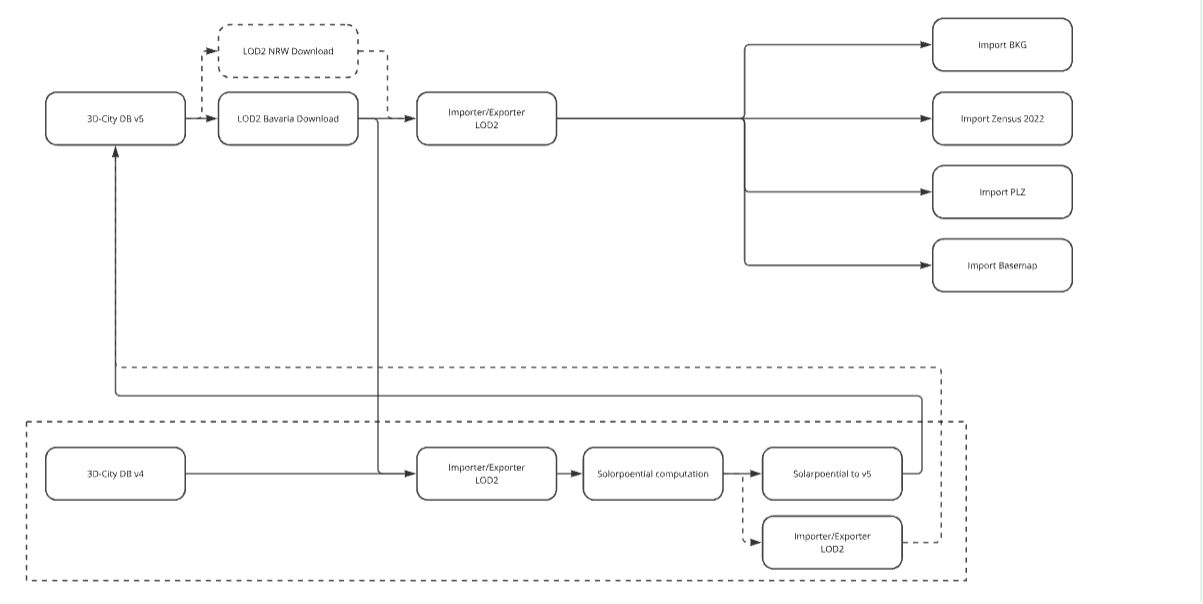
Sunsetting CityDB V4 and migrating solarpotantial to V5 via loader (Not yet applicable)
You should have cityDB v4 running on your system.
You should pull the image from gitlab repository, please check the readme file under data_importsunpot
You should run the solar potential calculation services under docker-compose.sunset.yaml.
docker-compose -f docker-compose.sunset.yaml up --build sunpot-core
docker-compose -f docker-compose.sunset.yaml up --build sunpot-texture
You should run next 2 services under docker-compose.sunset.yaml 1 by 1. It will export gml data under data_import/sunpot/data. And then via import-sunset-to-v5 service you can import your data to citydb v5 database. Please check for the sercie configurations if you want to see where the data is written and how it’s configured.
docker-compose -f docker-compose.sunset.yaml up --build export
docker-compose -f docker-compose.sunset.yaml up --build import-sunset-to-v5
Running the Application with Docker Compose (FastAPI + Databases)
Clone the repository:
git clone <repository_url>
Build the FastAPI Docker image:
docker-compose buildStart all services (FastAPI, TimescaleDB, 3DCityDB) in containers:
docker-compose up -d
Import LOD2 data into 3DCityDB using the following commands: (Note: Skip this step if the volume has already been created and populated.)
docker-compose -f docker-compose.lod2-import.yaml up --build downloader
docker-compose -f docker-compose.lod2-import.yaml up --build citydb-tool
If you want to import different types of data (not just LOD2), you can follow similar steps using the data_import configuration described in the section above.